Finding a sound effect should not mean digging through folders, opening a media player, closing it, and repeating the whole process for the next file. I used to do that a lot with Windows File Explorer and Windows Media Player. It worked, but it was slow.
Sample Scout is a keyboard-focused sample manager that makes browsing, auditioning, and collecting sounds much faster. After using it for a couple of months, it has become something I reach for pretty much every day, especially when I am working outside of Reaper.
It is not a replacement for every audio browser, and there are a few things I would like to see improved. But if you need a straightforward way to get through your sound library quickly, it is worth a look.
What Is Sample Scout?
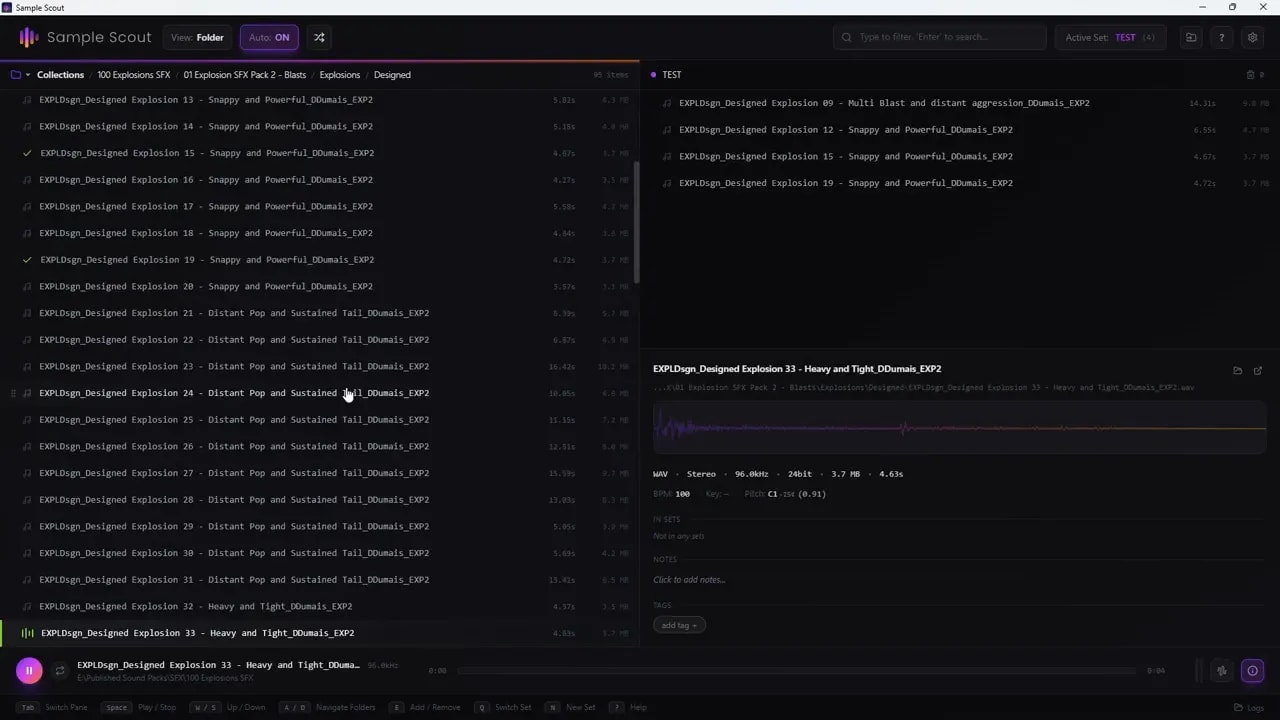
Sample Scout is built around a simple idea: keep your hands on the keyboard so you can move through sound files with fewer clicks. Most of the main browsing actions have shortcuts, and you can see a waveform preview as you audition files.
At the time of this review, Sample Scout was priced at $29. For comparison, Soundminer Basic was $200. That is not a like-for-like comparison, since Soundminer offers more, including metadata editing, but it gives you an idea of where Sample Scout sits on price.
Reaper’s Media Explorer is another option, included with Reaper at no additional cost. I still use it, but it is tied to Reaper. Sometimes I am working in RX or another application, and I want a separate sound browser available without relying on my DAW.
Getting Started: Collections and Sets
The two main ways to organise sounds in Sample Scout are collections and sets. They serve different purposes:
- Collections: Access to folders on your drive, such as sound libraries, recordings, and project folders.
- Sets: Groups of selected sounds you put together for a particular task, project, or export.
I have collections for different projects and recordings I am putting together. That gives me quick access to the folders I use regularly.
How to Add a Collection
- Open the collection settings.
- Add the folder path for a library or recording folder on your drive.
- Add it to your collections so it appears in the browser.
- Use the rescan option when you need to pick up new files.
Once those folders are available, you can get straight to browsing rather than navigating through Windows every time.
Browse and Audition Sounds with Keyboard Shortcuts
The keyboard workflow is the main reason I enjoy using Sample Scout. Moving through a folder of water jug recordings, for example, I can quickly hear each file and see its waveform without opening a separate player.
These are the shortcuts I use most:
- W, A, S, D: Navigate up, down, left, and right through the browser.
- P: Toggle automatic playback as you move between files.
- V: Switch between folder view and flat view.
- 0: Shuffle the file order.
- E: Add a selected sound file to a set.
Automatic playback is useful when I want to hear everything as I scroll. When I only want to browse names or navigate to another folder, I can turn it off.
The app also has a shortcuts reference, so you do not have to memorise everything at once.
Folder View vs. Flat View
Folder view lets you navigate through the folder structure. Flat view puts the sounds from the selected folder and its subfolders into one list, with the subfolder information still labelled.
For example, if a cannon library has separate folders for different recording distances, flat view lets me audition those sounds together without opening each subfolder individually.
What I particularly like is that this works at different levels. I can flatten one specific folder, or move up a level and browse the sounds from several folders together. That flexibility is really useful.
Shuffle and Search
Shuffle randomises the list, which gives me a different order to work through instead of always starting with the same numbered files.
Search is also available. Typing something like “tail” and pressing Enter brings up matching sounds.
There is one catch: search runs across all collections, not just the folder you are currently in. Sometimes I only want to find a particular sound inside the folder I have open, so the wider search can be annoying.
Build Sample Sets for Projects and Redesigns
Sets are a convenient way to gather sounds before you start working with them. You can browse different files, pick the ones you like, and keep them together for a redesign or another project.
For example, when browsing explosion sounds, I can:
- Create a new set for the project.
- Audition the files in a collection.
- Press E whenever I find a sound I want to keep.
- Continue browsing and adding sounds.
- Export the set or drag the sounds into my DAW or RX.
It is a quick way to create a shortlist without immediately filling a session with every possible sound.
This fits nicely into a broader sound design workflow: gather your source material, then move into the creative work with the sounds you need ready to go.
Export Sounds with the Settings You Need
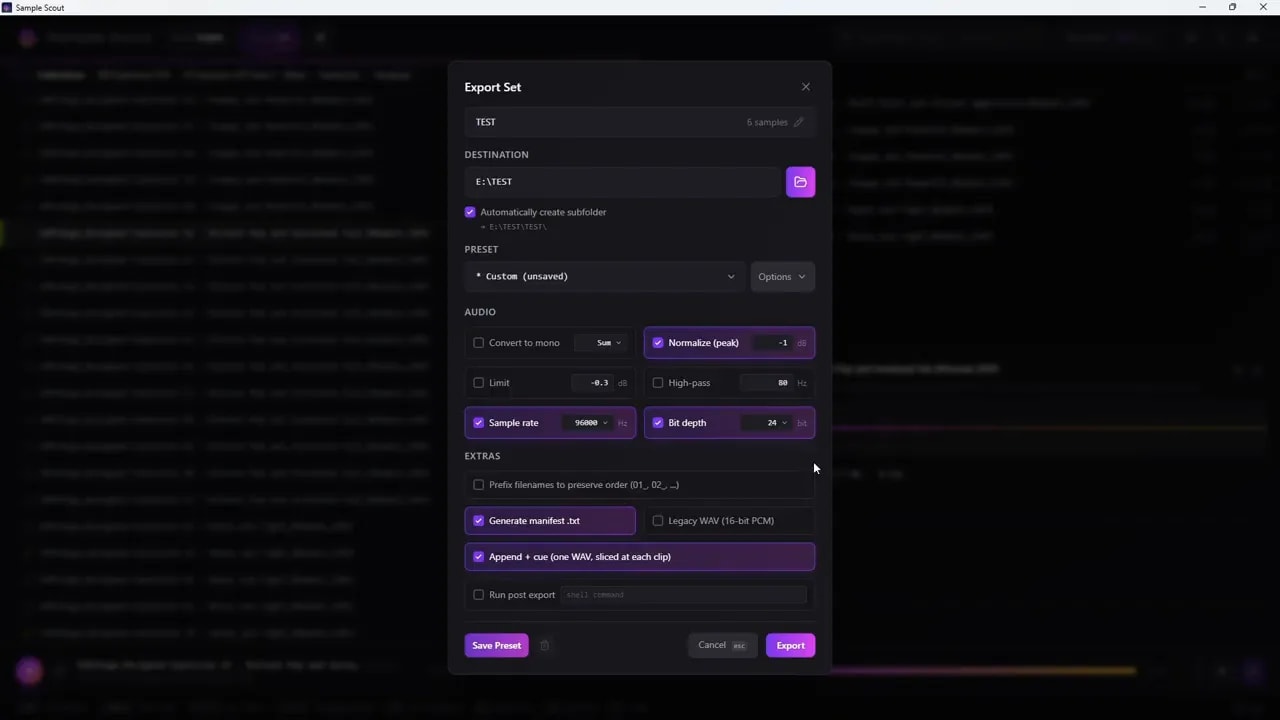
Sample Scout’s export options are particularly useful if you are preparing a collection for a hardware sampler or another destination with specific audio requirements.
You can:
- Normalise the audio.
- Choose the sample rate.
- Choose the bit depth.
- Sum to mono, or use only the left or right channel.
- Append the sounds into one continuous file.
- Generate a manifest for the export.
Append Sounds into One File
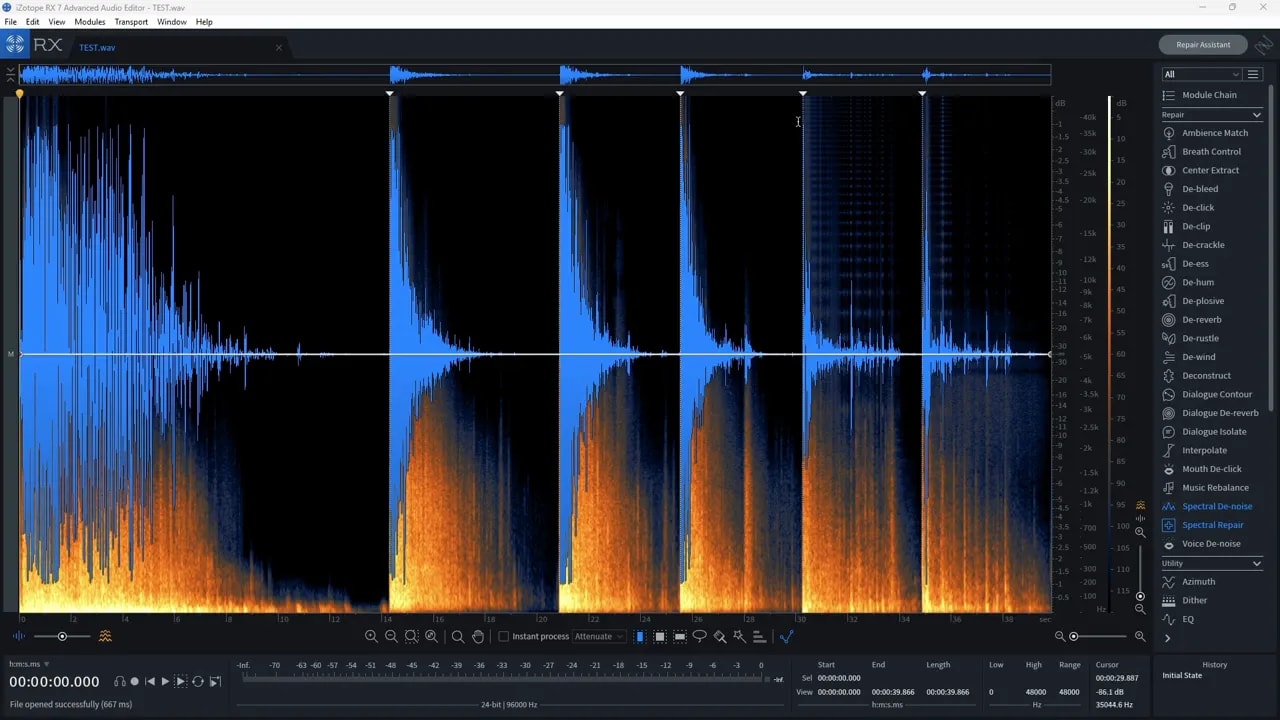
The append option joins your selected sounds into a single long file, sometimes called a sausage file.
When I opened an appended export in RX, there were markers at the start of each source sound. That made it easy to see where each one began within the combined file.
Keep Track of Sources with a Manifest
A manifest helps answer a question that can otherwise be frustrating later: where did this sound come from?
In my test, the manifest was a text file containing:
- The set name.
- The number of samples.
- The date and export information.
- The exported filenames.
- The original file locations on my drive.
I received the manifest when exporting the sounds individually, but not with the appended file in that test. If source tracking matters for your project, that distinction is worth keeping in mind.
Select Individual Hits from Longer Recordings
You do not always need an entire recording. Sometimes a file contains several takes, and you only want one hit.
For example, I have a recording of different boxes being hit. Rather than bring the whole recording into a session, I can select individual hits directly in Sample Scout.
- Open the waveform view for the recording.
- Select the section containing the hit you want.
- Adjust or move the selection as needed.
- Add that selected clip to your set.
- Repeat for other useful takes.
- Rename the clips and drag them into your DAW.
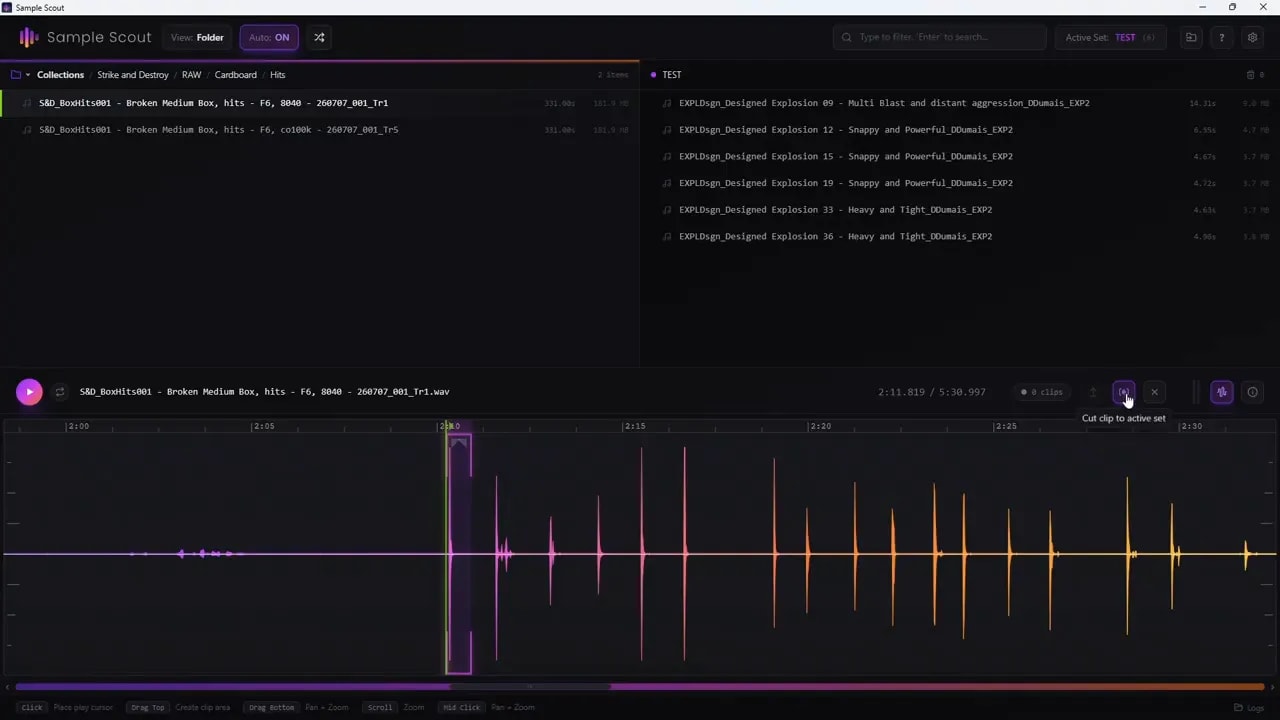
I renamed one of those clips “test box hit” before importing it into Reaper, and the name came through with the imported sound.
Non-Destructive Editing and Fades
You can also adjust the selected section and add fades before saving it to a set.
These edits are non-destructive. They do not cut, rename, or delete the original recording. I appreciate being able to prepare a useful clip without worrying about changing my source file.
The main drawback is that I could not find a keyboard shortcut for adding a selected waveform region to a set. Adding a whole file with E is quick, but collecting individual clips still required a mouse action in my workflow.
File Information, Notes, and Tags
Sample Scout also provides information about the selected audio file. The detail I use most is the file duration, but there are a few other useful options:
- Add notes to a sound.
- Add tags.
- Navigate to the source folder inside Sample Scout.
- Open the source folder in Windows File Explorer.
I do not personally use the notes feature much, but it is there if you want to keep extra information alongside a sound. Being able to jump to the original folder is handy when I need to locate the file on disk.
Who Is Sample Scout For?
Anyone Using File Explorer and a Media Player to Audition Audio
This is the biggest use case for me. My old process involved finding the folder, locating a file, and opening it just to hear what it contained.
Sample Scout removes a lot of that friction. I can go straight to a collection and audition sounds immediately, with a waveform visible as I browse.
People Preparing Sample Collections
If you regularly build sample sets, the combination of quick selection and export settings is useful. This is especially relevant when you need files at a particular sample rate and bit depth for a physical sampler.
It is also useful for gathering source material for a sound redesign, even if you are not preparing a hardware sample collection.
People Working Across Different Audio Applications
I often use Sample Scout on a second screen. I can browse there and drag sounds into my session without the browser covering the work in my DAW.
That separate-app workflow is valuable when I am moving between Reaper, RX, and other software.
When I Would Stay with Reaper’s Media Explorer
If I am already working inside Reaper, I would often just use Media Explorer. I can audition a file, press Enter to add it to a track, and start working. Reaper also lets me preview sounds with effects.
Sample Scout is not something I would recommend simply to replace Reaper’s Media Explorer. Its appeal is stronger when you want an independent browser or need to create collections outside Reaper.
What Sample Scout Does Well
- Fast navigation: WASD makes it easy to move through folders and files.
- Keyboard-focused browsing: Shortcuts reduce the number of clicks needed to audition sounds.
- Easy drag and drop: Getting sounds into a session is straightforward.
- Flexible browsing views: Folder view and flat view work well at different folder levels.
- Quick set creation: Gathering and exporting a group of sounds is simple.
- Non-destructive clip preparation: Selections and fades leave the original recordings untouched.
What I Would Like to See Improved
I have been enjoying Sample Scout, but a few things could make it more comfortable to use.
- Custom collection labels. Collection names come from the folders on your drive. I have two folders called “Sound Effects,” and it is easy to mix them up. An app-only name or alias would help distinguish them without renaming the actual folders.
- A shortcut for adding selected clips. I would like to send a waveform selection directly to a set from the keyboard, just as I can with a whole file.
- Easier key-binding customisation. The customisation option opened a folder, and I was not sure what to do from there. There may be a way to change the bindings, but an in-app editor would be much clearer.
- Adjustable panels. I would like to resize or rearrange the collections, set, and information areas to suit the way I work.
- Folder-specific search. An option to search only the current folder would make targeted browsing easier.
Is Sample Scout Worth Considering?
If your existing browser already does everything you need inside Reaper, you may not need another tool.
But if you spend too much time opening individual audio files in Windows, work across several audio applications, or regularly prepare sample sets, Sample Scout is a useful alternative. For me, its value comes down to getting through my sound files faster and getting the sounds I want into my work with less effort.
Disclosure: Samples Scout provided my copy for free. They did not pay me for this review and did not know I was preparing it. I am sharing it because it has genuinely been useful in my day-to-day workflow.